More house progress
I’ve lived with crappy unfinished floorboards in my our downstairs hall since May, so New Year’s Day was spent doing work on the house.
As much as I love being an eco-minded person and the OSMO Polyx floor oil, it wasn’t in the budget this time. Instead, we’ve used a low-VOC floor varnish in a rosewood color, which costs a third less. But the best part is this varnish touch-dry in around an hour, rather than 12 hours. You see, with two cats, it isn’t practical to use slow-drying stuff because we feel mean about locking them in a bedroom for that long…
The picture below shows the hall floor with the first coat of varnish alongside some boards in the pre-varnished state.
To achieve this look, we removed as many old paint splatters as possible, used the hand sander to lightly sand the surface, prepped the board with white spirit, and varnished. No heavy-duty sanders involved at all. Obviously, this look isn’t for everyone. It’s quite rustic (you might say sloppy….) but it allows the character of the Victorian-era pine to show through. Interestingly, the camera flash reveals uneven color on the varnished boards, but in real life the color is fairly uniform. We’ll be doing the second coat tomorrow.
Still yearning for the US…
I still hope we can move to the US in early 2009. The yearning is still there! We just need to, oh, let’s see…
- Sand and paint all the new window frames
- Sand and oil the floorboards in the downstairs hall
- Sand and oil the floorboards in the office/2nd bedroom
- Decorate the office/2nd bedroom (during which time the other half will be working out of the dining room!)
- Continue decluttering and selling off/freecycling everything we won’t take with us
- Pay off our bills / maximise earnings
That’s all 🙂
Oh My Stairs!
Whew, finished our stairs a few weekends ago. We’d taken up the carpet; cleaned, sanded and oiled the middle part of each tread and riser, and painted the outer parts of the treads and risers to match the skirtings.
Let me just say, this work was a pain with the kitties around. They always want to be with us – either to ‘help’, get cuddles or just hang out. They are very social!
The next stage will be the downstairs hall floor. We now know our only option is to shut them in the sitting room with their necessities just after our dinner, then oil our way to the base of the stairs. Then J and I will be upstairs for the evening (at least the loo is on the upper floor ;-))
Good thing the OSMO Polyx Oil dries in 10 hours or so.
-
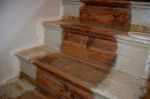
- The stairs in their original state
-

- Jack, who always wants to ‘help’
-

- Cat Barrier Take 1
-

- Finished stairs
Door Knocker Finished
Sorry for the lack of updates recently. I’d like to say this is because we’ve been far to busy finishing the house, but that wouldn’t quite be the truth.
However, a few things have been done; We’ve finally finished the door knocker! It’s been stripped and, along with the door, repainted. The detail in the bat is incredible, so much had been hidden by layers of paint. Take a look yourself:
 Stripping…
 Stripped! Amazing detail – you can see the veins in the wings (top right picture)
 Another close up…
 Finally reinstalled, and given a (thin!) coat of black paint.
House Got a Shave….
 A long time ago, the previous owners painted the stonework on the front of the house. Unfortunately, water can get inside the stone and get trapped behind the layer(s) of paint, causing eventual bubbling and cracking of paint, and damage to the stone. The house looked awful on the outside, so we agreed to spend a big portion of our budget on having the stone dealt with.
There are two ways to remedy the problem. One involves applying a chemical paint remover to the stone, and the other involves manually scraping the paint off. You can guess which one we went for.
The stonemasons have now finished “cleaning” the stone at the front of the house. In fact, you could say they shaved the stone. First they used a rotary sander, then finished it by hand.
This photo shows the amount of stone taken off by the sander, up to 8mm in some places.
After they finished scraping, they washed it all down with water, then filled in the joints with matching lime mortar-type stuff.
It looks awesome, and it’s a nice feeling when we spy passerbys admiring the work done by the stonemasons. A neighbour was particularly impressed — she commented that it’s raised the tone of the street (yes, because it was definitely lowering it before!!!)
UPDATE: We’ve had many compliments on her stonework now and several people have actually approached us and asked for the name the stone mason.
Kitchen and Bathroom Update
Well, surprise, surprise, the kitchen and bathroom aren’t yet done. As it stands, we’re desperate to get our furniture out of storage. Our things have been in there too long and it’s really made a dent in the budget!
So, with the kitchen and bathroom (inc shower!) functional, we’re now concentrating our efforts on the bedroom.
There’s so much I’ve wanted to mention here – tips, product reviews etc but it’s all just fled from my mind. I’ll update it later!
Kitchen Nearly There (apart from tiles)

excuse the mess!
The builder, plumbers and electricians have all been working on the kitchen for the past few weeks. It feels like work is coming to a close soon.
There were just a few issues: the overhead lights we chose were too long, the power sockets had to be re-done, some cables moved, etc. Other electrics were in the wrong position or missing altogether but we’re going to work with it, rather than mess up plaster. Let’s just say one of the electricians who worked on it probably won’t have a job – he’s apparently annoyed other customers too.
 The next job is to decide on colours for the walls and the tongue and groove, bearing in mind the tiles we’ve acquired from various eBay auctions.
Moving forward slowly
We had some time away while the “worst” of the building work was done by our builder, plumber and electrician (rip out bathroom and kitchen, replace bathroom floor/kitchen ceiling, replumb, rewire, open up wall in kitchen etc) but due to extra building work, neither kitchen or bathroom are nowhere near being done!! 🙂
Several weeks ago I arranged for good friend of mine to stay this Wednesday night with us, thinking we’d nearly be there with the work. I’ve warned her last night what to expect: tons of dust, bare surfaces, exposed wiring (and oh yeah, no overhead lights cos of said wires!), no kitchen, basic bathroom (tub and toilet only) etc.
Oh well, it’ll be worth it 🙂

The latest picture of the kitchen. Units are ready to be fixed into place!
No turning back!
Loads happening soon! On Monday, the Big Scary Projects start, namely replacing the kitchen and bathroom entirely. From a money point of view, things are costing more than we’d like. A combination of unplanned work and also, we’re not quite so quick to compromise quality. I need to earn more money! All I can say is that it’s a darn good thing we found so many tiles for sale on eBay. 🙂
Other projects recently completed include
- garden shed (base done by builder, assembly, painting and filling up by us)
- conversion of airing cupboard to a proper space to hang clothes (following the work done by builder to create new loft hatch)
- shopping for oven, gas hob, tiles etc 😉
"No real progress"… now really, come on.
A couple of posts ago LMR said “Bought a kitchen … but no real progress”. I have to take issue with that 🙂
I spent three days, three mind-numbing, throat-choking, back-breaking days, in the loft that Easter weekend. Including Easter Sunday when I should have rightly been chowing down on chocolate. And it was unusually sunny too! Grrr.

We’d been thinking that the plasterer was due in the next week to sort out our bedroom ceiling (oh silly us for thinking that). We’d just had a structural engineer in to talk walls – but whilst he was with us, I took the opportunity to talk about the loft. He recommended that we strengthen the support for the ceiling, as the “binder” for the span was a little small. Eeek!
So I popped to the shops and got some bits of wood, to tie the “purlin” to the “binder”. I needed to use some additional wedge shaped blocks to pack the space between my new tie and purlin, as it comes out at an angle. In the picture above you can see two ties either side, sandwiching the supports. There are another two on the other side, slightly staggered because of the chimney breast.
 I also bought some hardboard and screwed this to the eaves (allow plenty of room for ventilation – it’s the law!)- which took a lot longer than I’d anticipated, because it meant crawling into spaces that really weren’t designed for my 6’2″ frame :S
This allowed us, sorry me (don’t forget it was me that was in the loft for 3 days. Did I mention that?! 😉 ) to fill the loft space above the bedroom with the extra 10-15cm of Warmcel that it needed. I still have to do the other side though. But at least we have a loft-hatch now. See a forthcoming episode!
(DIY Tip: I used some Fasten Master TimberLok screws, which were amazing. They come with the hex bit for your drill, and no pilot hole needed. Expensive, but they save so much time! BTW I’m not some kind of salesman, just thought these were ace. Don’t know what the pros think of them…)
